
I know many visitors to my site expect me to stick to Chainsaws. But as it turns out, folks treat me more or less like a handyman, and I field a wide variety of questions.
One question I get a lot:
How do I convert a lightswitch to an electrical outlet?
Or:
Jeff, how do I add an electrical outlet?
Electricians are expensive, and I try not to hire one unless I really have to. As it turns out, adding an electrical outlet can be pretty simple under certain situations, and you may not have to spend the money on an electrician.
I recently wired in a new outlet for my neighbor down the street. They had a unique situation. The husband received a 3D printer from the wife for Christmas, and was enjoying using it as a new hobby. But after a few weeks of having it sitting and operating on the table in their dining room, they were wanting to find a more appropriate home for it.
They had a closet off the main hall that had plenty of room. It had some shelves in it and was rarely used. It did have an overhead light with a lightswitch, but it did not have an electrical outlet.
That closet made it very easy for me.
This is what you need…
Note this method won’t work if you don’t have a neutral wire supplied to the existing light switch.
My suggestions and tips:
1) Turn off the breaker that supplies power to the existing room/light switch.
2) Use a voltage detector or multimeter to make sure the switch doesn’t have power running to it and is safe to work on. Don’t have one? Click here.
3) Pull the switch out of the switch box, and disconnect the wires from the switch.
4) You will probably have two black hot wires (one is line, one is load), and a bare copper ground wire.
5) If you’re lucky, in the back of the box you’ll find a white neutral wire. This usually isn’t being used unless you already have some kind of smart switch installed. If this isn’t present, this method won’t work for you.
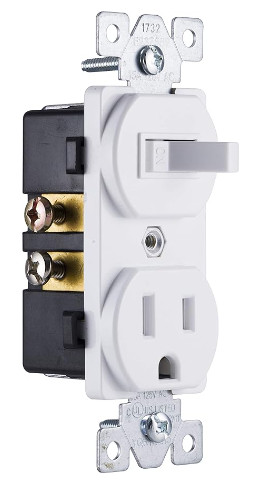
6) Figure out which of the black wires is your line wire, and wire it into the appropriate spot on your new switch/receptacle combo.
7) Same thing for your load wire, and your neutral wire. The directions provided with the new switch will tell you which terminal is which.
8) For the neutral wire that you fish out of the back of the box, just take the wire nut off and add a short (maybe 3 inch) pigtail, put the wire nut back on, and wire that pigtail into the correct terminal in the new switch.
9) Depending on what you ordered, you can make the new outlet switched (i.e. it only has power when you turn the light switch on) or continuous. The outlet will have a little bridge bar that you’ll have to remove if you don’t want it to have power continuously.
10) After you screw the new switch to the outlet box, turn the breaker back on and test both the switch and the receptacle to make sure they are getting power and work properly.
Don’t mess around with this if you don’t know electrical basics, as you don’t want to electrocute yourself or create a fire hazard.
That’s my quick/easy method for adding a receptacle to any room that has a light switch!
Let me know if you have questions.