 I am a little ashamed to admit this, but for a long time I would use a chain until it got too dull to cut, and I would throw it away.
I had tried sharpening my own chain before, but wasn’t satisfied with the results.
Taking it to a shop to have it done seemed like a bad option. The guy quoted me $6-$8 per chain to sharpen them. But I have to drive over there, leave them, then drive back to pick them up. When you look at what that costs including gas and wear and tear on my vehicle, I’d rather just spend $10 and buy a new chain!
But throwing them away is wasteful, and I regret all those years and all those chains.
Sharpening them yourself isn’t that hard when a) you know how, and b) you have the right tools.
Plus, now instead of using them until they are frustratingly dull, I will sharpen them pretty much after every use, even if it’s just a small tweak, and even if they aren’t in terrible shape. That means a lot less frustration, and a lot less downtime.
DIY Guide
If you’ve never done this before (or even if you’ve had some practice), here’s how I do it…
1. Pick your file size
I always use round files for sharpening. They do make square files, but that’s a topic for another day.
You’ll have to match your file size with your chain size. The most common sizes of chainsaw files are 5/32, 3/16 and 7/32. If you aren’t sure, check your owner’s manual. You can also look on the back of the box if you bought a replacement chain.
2. Disconnect
For the sake of safety, you should disconnect the chainsaw from its power source.
If it’s a battery chainsaw, you would not want to start sharpening the chain with the battery installed. Of course it would be unlikely that you somehow accidentally turn it on, but trust me you want to finish this up with all ten of your fingers working, so just remove the battery.
If it’s a corded chainsaw, obviously just yank the cord.
If it’s a petrol saw, you are supposed to remove the spark plug just to be 100% safe.
3. Clean it
I always take this opportunity to clean the saw and chain.
These things get dirty. If you’re like me, you make some serious chips fly, and they stick to and clog up everything.
Taking five minutes will get you a long way toward making sure your sharpening efforts are successful, and your saw is ready for it’s next use.
Undo the covers and knock the debris out. Check your bar oil. Check your chain tension. Check your air filter if you have one. I will typically even scrape out the bar groove etc.
4. Set the file/guide
You are probably going to use a little fixture/jig for the file. It acts as a guide so that you get the right angle when you’re filing the teeth. I’ll have a few recommendations a little ways down the page.
Your guide will have various angles, but 30 degrees is the most common.
5. Clamp
I’ve done this before without clamping, but I wouldn’t recommend it.
Most kits are going to come with either a bar holder for a bench vise that will work if you’re sharpening in your garage or workshop, or in a stump vise if you’re still at the job site and sharpening there. I’ve also seen tailgate vises.
6. File the first side/direction
I mark where I’m starting on the chain. That way you’ll know when you’ve made a full revolution – nobody wants to waste their time by filing twice.
Then file from the inside of the tooth to the outside of the tooth. The tip of the file is always going to point away from the chainsaw motor.
You will hold the file at 90 degrees to the flat guide bar and then move it at a 30 degree angle to the straight line of the chain. The guide you set up in step 4 will help you.
You file every other tooth along the chain from the first direction, and then you switch and do the same thing (hitting the teeth you skipped) from the other direction.
I usually sharpen 2 or 3 teeth, then release the chain brake and rotate the chain a little bit as I move along.
7. Reverse
After you’ve done that first side, flip the saw in your vice, re-clamp it, and do the other side.
Note – you are only going to file/sharpen on the “push” stroke. Files don’t file on the return stroke. It just doesn’t work that way, it will grab and you’ll get frustrated.
8. Depth gauges
Once you’re done filing/sharpening the cutting teeth, use the gauge included in your kit to check the depth gauge teeth on your chain. If they are too tall, which can happen as your cutting teeth wear and you file them down to sharpen them, then your chain will take off tiny little specks as you cut next time and it will take you forever.
So check the depth with the gauge, and use the flat file to shorten them if needed. These don’t require as much attention as sharpening the cutting teeth, but I always check them every time because it only takes a few extra minutes and you’re already right there ready to do the work.
That’s it!
Gear
First of all, you are going to want to wear gloves. Farting around with these chains is a good way to slice your fingers and hands up. There is a certain amount of dexterity needed to get this job done, and gloves will tend to hamper that, but it’s not worth the risks to go without gloves.
You can go cheap, you can nice, or you can go really nice.
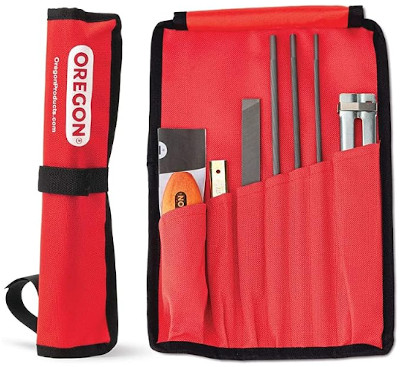
My cheap recommendation is to get a manual kit like this Oregon.
Here’s my reasoning…
First, I like that it’s a “brand name”. Oregon has been in the game for a while. They have a good reputation, and you know their stuff isn’t crap, even though it’s around $20.
Second, I like that it comes in a pouch. It’s too easy to lose this stuff if it’s just loose and bouncing around in your truck or a box somewhere.
Third, this has all the common round file sizes, the flat file you need for depth, a handle for the files, and an angle gauge.
My middle of the road recommendation, if you are willing to spend a little more money, is to add an electric tool.
This Sharp Pebble tool is 120 volt, so it will plug in to any standard garage outlet.
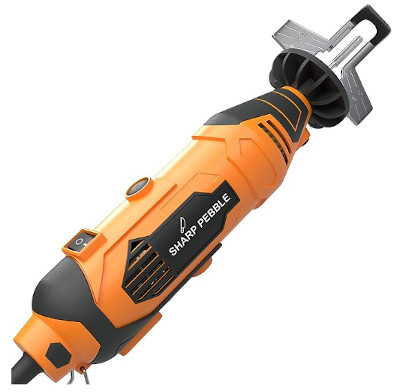
It makes sharpening the teeth a lot more repeatable and goes maybe 50% to 75% faster.
And if you want to go all out, and get the nicest tool around, I would get the fully automatic Temco…

There’s a pretty good video on the Amazon page if you want to check it out.
These things are pricey, but when I say fully automatic, I mean this thing does everything but tie your shoelaces for you.
I use a basic kit plus an electric tool, but I stopped by one of the local saw shops to try one of these Temco’s out last week. It is really cool, and does a fantastic job. I am definitely considering buying my own.
So there you go, all of my recommendations as well as my pathetic confession! If you have any questions, just let me know and I’m happy to try and help.

 I need it to do its job every time without complaint, and without a fuss.

 You will no longer be uneducated, or have to rely on random nextdoor neighbor guesstimates. You are going to get the real, accurate scoop…
 Maybe you’re ordering wood and the guy is going to sell you a certain number of cords for $100. Maybe you’re cutting or splitting wood, and you’re wondering how much there is to cut or split. Regardless, you don’t say “a truckload” or “about 500 pounds”. You use the number of cords to describe the amount.
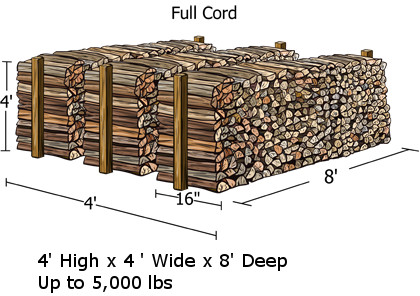
 You can use those dimensions to help you estimate the volume of wood in uncut, unsplit logs too. If you have a pile of logs that are 16 feet long and roughly 4 feet high and 4 feet wide, then you would extrapolate that to mean there are 2 cords of wood there. Make sense?